Sunday, January 29, 2012

Space Rocket Birthday Party

For my son's 5th Birthday he wanted a Space Rocket Party.  I just got online and started clicking away.  Turns out, I think there is a blog or an idea for just about every kind of party one could dream of.  That-is-COOL!  I love it.  So, I found a bunch of different ideas that I loved and I used some from a few different sites.  I also used my Cricut Space Party Cartridge!  It is incredibly cool.  Here is the invitation.


It was pretty cool how the flame pulls out to read the invitation.  They were surprisingly easy. I used blue, black and yellow cardstock some velum for the window and gems for the lights. Little bit of glitter glue and there you have it.  Easy Peasy & Cute.

I then found this gal and made Jet Packs.  They are time consuming to make (I made 20 of them).  The kids helped with the packing peanuts and that was fun for them. We got ALL of the bottles and packing peanuts for FREE using Freecycle.  If you don't already freecycle, find out if you have one available in your towns or nearby towns, I think it is a great way to keep stuff out of the landfills and clean out your house, or even to find 40 empty soda bottles without having to drink a drop.   One of the things I did wrong was fill the Jet Packs too full.  I liked the original one I saw better, that way when the kids would jump up and down or run around they'd make noise.  These were still a big hit and I know a couple of the kids that still have theirs and it is 3 months later.


FOOD!  I used a couple of sites for the food ideas.  We used UFO Bagels and Saturn Pizza's and the Cheetos ideas from the interweb, the rest Monte and I just came up with names for food we wanted to serve.  I love labels, so we of course had to come up with clever names for things.


You have got to LOVE Dry Ice - right?  It was a huge hit.  We used V8 Fusion juice for the Rocket Fuel.  

Let the Games Begin!!

We played Pin the Alien on the Moon.  I made the Aliens with my Cricut Space Party Cartridge and Monte got an image of the moon on line and used his Large Format Printer to get a big Moon.  


I made the Banner too using my Cricut.  I can't find out which one I used for the life of me, once I do, I shall update it.  

Then my incredibly AWESOME and BRILLIANT hubby found a Rocket Launcher that you can order, and make at home, then download prints to make homemade rockets.  Monte was so excited he nearly burst. So, not only did he make the Rocket Launcher, but he decided to make a rocket for each kid. (20)  He also had some 'practice rockets' that he 'practiced' with outside at night when the kids were in bed.  Let's just say this really made the party BLAST OFF.  It was a huge hit and some of the kids took their rockets home.  They flew everywhere!  In the road, down the street, in the neighbors yards.  We were finding the rockets for like a week.  


Then there was CAKE!
I was going to make a Space Shuttle Cake but, as the date of the party got closer, I ran out of steam.  So, I went with cupcakes instead.  I just got a white cake box and frosting, I added silver jimmies to the cake batter, with the hopes that they would look like little rocks inside (it was fine) and then sprinkled the silver sugar on top to make it look like gravel or space rocks.  Then, using Cricut Space Party Cartridge I made more space rockets and glued 1/2 of a skewer to them and jabbed them into the cupcake and called it done.  I also made the Alien Head Cake Pops, using my book from Bakerella.  The cake pops were lemon and I found the purple chocolate covered sesame seeds at Party City.  


So, the Aliens weren't as awesome as the ones in the book, but not bad for my second try at cake pops.

Then, it was time to leave.  I made homemade Moonsand.  I got the idea from another Rocket themed blog post, and used her link for making the moonsand.  I then used some cute 'to go' containers I had left over from a Baby Shower I co-threw.  Then I used the  Cricut Space Party Cartridge to make the UFO's and put them on the box.  I used a normal Circle Punch and a Thank you Stamp to finish the job. I also found Jet gummies at our local candy store and put them in little baggies for each kid.  


Noah's favorite color is purple, so that was the color of the moonsand.  Now, one thing I'd do differently is put a note in the bucket with the moonsand.  I'd say what it is and how to use it and how to preserve it.  I did not do that, I think it was something I wanted to do, but it just didn't happen.  Turns out, not everyone knows what it is and how to use it.

So, there you have it, the Space Rocket Themed Birthday Party.  Use all, use some, add to it, let me know how yours turns out!

Thursday, January 26, 2012

Butterflies and Bookmarks

Almost every holiday I try to have some little goodie bag for my kids classmates.  This year a friend posted on facebook a list of crafts from this website and I saw these butterflies and just had to take a swing at them.  I did not use the template that was given, I decided to use my Cricut Expression  I have to say, this is the single MOST loved electronic I own.  (Hard to believe since we have a lot of gadgets and I am married to a total geek.)   I used the Elegant Edges Cartridge and made my machine do the work for me.  :)  I used 4" on my machine and managed to get 4 per page.  I found a stack of Valentine paper at Michael's for 40% off.  (Does anyone pay full price?)  I was quite excited by it.  I got the suckers from Target.  Sadly they were not on sale, but I got 4 bags.  Here is a bit of information for you.  The bag says 'about 16 servings' per bag, but in reality there are only 15 per bag.  So, when you need 64 and you only get 60, you have to go back to the store and get another bag.  That was the most expensive part of this project at a whopping $12.50.


Here is the butterfly, thanks to my Cricut. (I am so glad I didn't have to cut out 64 by hand.)


Here are a couple with the suckers.

I thought they were pretty cute as is and I hummed and hawwed debating on eyes or no eyes, stickers or no stickers.  I got these stickers at Target for a buck each in the dollar bin.  Now, lets see 64 x 4 = aw, heck I am not doing math in the dollar bin at Target, get 5 the kids can play with the rest.


                                                                I then said 'yes' to eyeballs.


I ran through the store and picked them up.  It was a quick run in and out.  Lucky me, Michael's is on the way to and from the kids school, we drive right past it.  The debate then was 6mm or 7mm, I went with 7.  I am not sure everyone would put as much thought into the size of the eyeballs as I did, I am still not sure if I picked the right ones, but, I just had to make a decision.  So, do I want the smaller ones with the smaller iris part of the eye, or did I want a bigger surface to work with for the glue.  I know, I know,  I over think things, but I like efficiency more than anything I can think of at this moment. So, I went with the larger gluing surface.

                                                        So, here is the finished product.


                                                      And here is what 64 of them look like.


Then I saw these bookmarks and I wanted to make those too.  The bookmarks were easy, I already had a big stash of Red Paper and Animal Pattern Paper. I didn't want to do toy animals (pricey - I did make 64 of these), so I went with the foam animal and heart stickers.  (From Micheal's I paid $8.00 for all of them put together.)  The kids helped me put a lot of the animal stickers on.  Then instead of the animal Valentine sayings, I wanted to kinda put the 'love' of reading into this craft.  I just used my Elegant Edges Cartridge made 64 little phrase cut outs.  Then and I planned to run them through my Xyron machine.  I must say I love this thing.  I did not get it from Amazon, I got it from Michael's with either a 40% or 50% off coupon and I have had it for awhile now.  (Always wait for your coupons before buying refill carts.)  But, then I decided to lower the cost and just use glue.   Here is the finished product.  I think they are pretty cute and that they will get used and not just tossed or lost with other chachki type junk that I may otherwise send.  That and I am sure they have a million pencils and erasers from us by now.


Monday, January 23, 2012

Cake Pops - the beginning...


Ahhh, Cake Pops...
I was given this book from a friend that said she 'thought of me' when she saw it.  I was thinking, 'she must be crazy' but now I am in love!  So, I am forever grateful for my dear friend Kandice who feeds my addictions.

Our amazing and awesome and super cool feel at home church TerraNova had a VBS this past summer called A Jungle Adventure!  I was given the honor of helping out with the Crafts for the week and had a ton of super helpful co-leaders and helpers.  At the end of the week, I really wanted to do something special for them as a thank you.  Now, what better way to say Thank you than with a Cake Pop?  Right?

Me, being the person that I am, that loves themes instantly thinks of MONKEYS!  Now, I only had a couple of days to think of this and plan, so, I didn't have time to make my practice pops.  I just dove right in.  Honestly, I think everyone should start out with the basics, something simple, like a ball in a cup or just a ball on a stick.  But, I was pressed for time.  So, I just went for it.


Not bad for my first attempt.  I think these little guys turned out pretty darn cute.  Oh, Bakerella how I love you so!  I put them in little bags that I got from Michael's and followed along with the books instructions/guidelines/ideas.   I used a chocolate cake mix and chocolate frosting.  I couldn't find the mini black wafer sprinkles (it was summer - those come out in the Fall) so I had to make do with what I had.  The sugar looked better than me just drawing in the eyes, and I wanted it to look different from the nose.  So, that is what I came up with.  :)

My second attempt at cake pops was for my son's 5th Birthday party.  I made them for the grown-ups, but the kids went wild for them.  My son's party was a Space Rocket Theme.  (Stay tuned, I will have a party post soon.) So, I made Alien Heads!


Cute huh?  No where near as perfected as Bakerella.  I sure am in awe of her awesomeness.  But, still cute! I used a Lemon cake mix and Lemon frosting for the Aliens.

And there you have it, just the beginning of my cake pop experimenting!

My daughter informed me that she wants a Pink Monkey themed Birthday Party, with flowers.  Okay, oh, the options are endless.  Stay tuned.  (Her Birthday is at the end of March.)


Saturday, January 21, 2012

FRUIT KABOBS

I went to a friends house to keep an eye on her kiddos as she went to do an errand and she had a super cute snack prepared for her kids and mine.  Fruit Kabobs!  My kids loved it and wanted to do them at home.  You can do this yourself too.  It is a great way to have them prepare their own snack as well as give them something healthy to eat and it takes more than a minute to eat.  I find myself thinking, wow, it takes time to put snacks together (or crafts) and less than a few minutes for them to be inhaled (or made).  You can use just about any fruit with these guys.  My kids love Asian Pears so that was first on their list.  They can be different every time too, depending on what fruit is in your kitchen or what is seasonal.  My friend used 4 mini Marshmallows per kid at her house, I usually give them only 1 large Marshmallow (it is what we had) but this time I gave them 2.


Friday, January 20, 2012

Cakes - the beginning...

I have always been a cake box and can of frosting in a 13"x9" pan kind of girl.  That is until I had my own kids.  For my son's 2nd Birthday (he's 5 now) I got an idea.  (By the way, whenever I say this my hubby braces for impact, he also jumps on board, usually.)  I wanted to make a train cake.  Themed Parties need themed cakes right?  So, I went out and got this Train Cake Pan.  Oh.my.gosh was it cool!

I like to practice when it comes to decorating so I started 2 months before my son's party.  I got images on line and printed them out, spent way too much time and money on candy to practice with.  The things you learn in a candy store or at a craft store.  You can buy edible spray paint, and chocolate rocks, and white rock candy makes a great smoke stack, oh, and lets not forget Twizzlers, they make excellent railroad tracks!  That was fun.  Lucky for me, I got so much candy I was able to use the leftovers from the practice cakes to use on the actual Birthday Cake.


These are the practice cakes.  I was pleased with them.  I took pictures and wrote a list with a description for each cake for the main event.


Here are the final cakes.I used that green edible spray paint for the bottom, so it looked like grass (meh) and the black for the coals in the coal train.  You can see the Twizzlers for tracks.


Here is a close up of the smoke stack, I got a nice big one for the Birthday boy.  Oh, he loved it.  


I used the recipe that came with the pan for the cakes.  It was pretty good, like I said, I like box cakes, so anything homemade seems heavier to me.   (Can we say homemade = no chemicals boys and girls?)   It held up really well and there was plenty of batter left over to make a little cake.  My hubby was awesome and whipped me up a stencil, then we just used sugar to decorate.


Not bad for the 'grown-ups' cake.  My boy thought it was the greatest!

As you can see, I am still a beginner and I pray to God, I never wind up on Cake Wrecks.  Thanks Brooke for showing me something that is even like that out there.  I am wondering if I should be more careful knowing there is something like that out there. But, I am just a Mom, trying to make things fun for my kids.  


My next cake was a year and a half later for my daughter's 2nd Birthday (she's almost 4 now.)  I wanted to try my go at piping.  (Insert laugh here.)  We were having a flower party, so I borrowed this pan.  I used a Lemon Flavored Cake Box, but this frosting.  I loved this icing recipe for a year or so, I don't as much anymore.  I really like it for piping, I think it tastes great, it just doesn't settle well with me anymore.  Hold your breath... wait for it...


Okay, now you can laugh.  This is my first try at any form of piping. I had never even heard of a crumb coat.  Fortunately I have some nice friends on FaceBook that gave me some tips and pointers and my second attempt was much better.  Then, so was the third.  


What I learned about piping is that it takes practice and some serious hand strength.  For now, I do not have that hand strength or the time to practice and build up the hand strength.  I may take it up again later, but not right now, I need to get my hand to a point where I can shake someones hand with a firm grip again.  :)   

While looking for flower cake pans and flower ideas I saw cupcakes in a basket.  I can't find the orginial person I got the idea from, but here is mine, it is copied and from someone clever I assume. 


So stinking cute!  The bottom of the basket is filled with Chocolate Rice Krispy Treats (not as good as they sound).  Then you add the cupcake layer with 3 regular sized cupcakes and then Mini's all around.  (Lemon again, yes, my favorite.)  I used the same icing as last time too.  You can't see it in this picture, but I got a little wild with the colors of icing and put some white with some colored and got a little stripe.

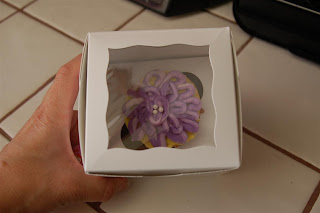
Since I had some left over cupcakes I decided to still pipe them as flowers and give them to friends.  I loved these little boxes I found at Michael's.


The box was just a little cutesy way of dropping of a little surprise gift to some girl friends here and there.  :) 

There you have it, the beginning of my cake creations.  These will be few and far between.  But, fun, nonetheless.  I hope you got inspired or a giggle, whichever suits your fancy.


Wednesday, January 18, 2012

Diaper Cakes


I first heard of diaper cakes when I was co-throwing a baby shower for my BFF.  I had never heard of them and was quite confused.  Then, I finally saw one and thought 'how clever'.  Four years later and I found myself wanting to make one for a shower I was invited to.  I looked all over the internet to 'buy' one, then I thought why not make one?  Well, there are A LOT of ideas out there.  Have you ever visited Cake Wrecks?  Well, they should have a whole section dedicated to Diaper Cakes.  The ones with the most 'generous gifts' on them are too busy for my tastes, but the 'gifts' are super thoughtful.  Anyway I found this gal on you tube and I loved her simplicity and elegance.

Now, even my own diaper cakes could be on Cake Wrecks, they are far from professional or even amateur, but not too bad for a beginner.  Oh, and have I mentioned I am a work in progress when it comes to photography?  

Here are my first four cakes (in order).  I'd love to see yours, maybe I'll branch out one day, and try different ways to make them, but most of my friends are done having babies, so I'll put this hobby on the back burner for now.


I like this last one the most.  I didn't have any restrictions.   The girls I did this for had no idea what they wanted or what this was anyways, so that is why I was able to experiment with the flowers.  :) 

CRASH!!!


Happy 2012! So, I liked my first welcome 'So, I begin' post, so I have decided to keep it up. The day after I started this blog and wrote that post, my family was in a car accident. Everyone was fine, but me. The airbags deployed and it broke my right hand/wrist in 3 places as well as burned my left hand and bruised my left forearm up to my elbow. (Can we say OW?) I was pretty much unable to use either of my hands for about 2 weeks and my right one has taken quite some time to heal. So... I got help from some amazing friends with everything from writing and typing to making the wigs for the kids Halloween Costumes. I was taken care of, got invited to a friends for Thanksgiving, hired a young neighbor girl to do the prep for my Christmas baking and managed the every day tasks until I healed. Then we had a house full of that stomach flu (That one was nasty.) the week of Christmas! So here I am ready to start my blog! Finally!

So, here I start with what my hubby calls a 'core dump'. A very common occurrence from me. Ton's of info all at once and then I get all busy doing something else. I always have about a trillion irons in the fire, organizing, baking, party planning, cleaning, scrapping, or going on adventures. (The usual Mom stuff.) So, for those of you kind enough to visit, Thanks! I hope you get something useful from this blog and not just Whiplash.


Related Posts Plugin for WordPress, Blogger...